

How to create Google Analytics 4 events with Google Tag Manager
Here is an up-to-date, step-by-step tutorial to show you how to create Google Analytics 4 events using Google Tag Manager.
How does ecommerce tracking works with GA4
Top By Augustin Delporte•
If you have an online shop, you probably want your ecommerce data to be available in Google Analytics 4. In this article, we explore how this implementation works.

We’ve been teaching Google Analytics for years now, and often, when we meet new online store owners or marketing specialists working with ecommerce platforms, we have to break the news: getting ecommerce data flowing in Google Analytics is not always as straightforward as most think.
Google Analytics 4 (GA4) is centered on events. And even though it automatically tracks several interactions, ecommerce requires an extra implementation.
In this article, we explain how ecommerce tracking works in GA4 and how you can implement it for an online store.
This is not unique to Google Analytics 4, every ecommerce data we want to recover must be based on dedicated events. Each action, such as add to cart, remove from cart, purchase… has its own event which needs to be triggered when the interaction in question occurs.
Thankfully, the events in question are part of the list of recommended events that Google provides us. Check the documentation to get all the details. You need to use those recommended events in order to have the builtin GA4 ecommerce reporting going.
Let’s review the main events that you need.
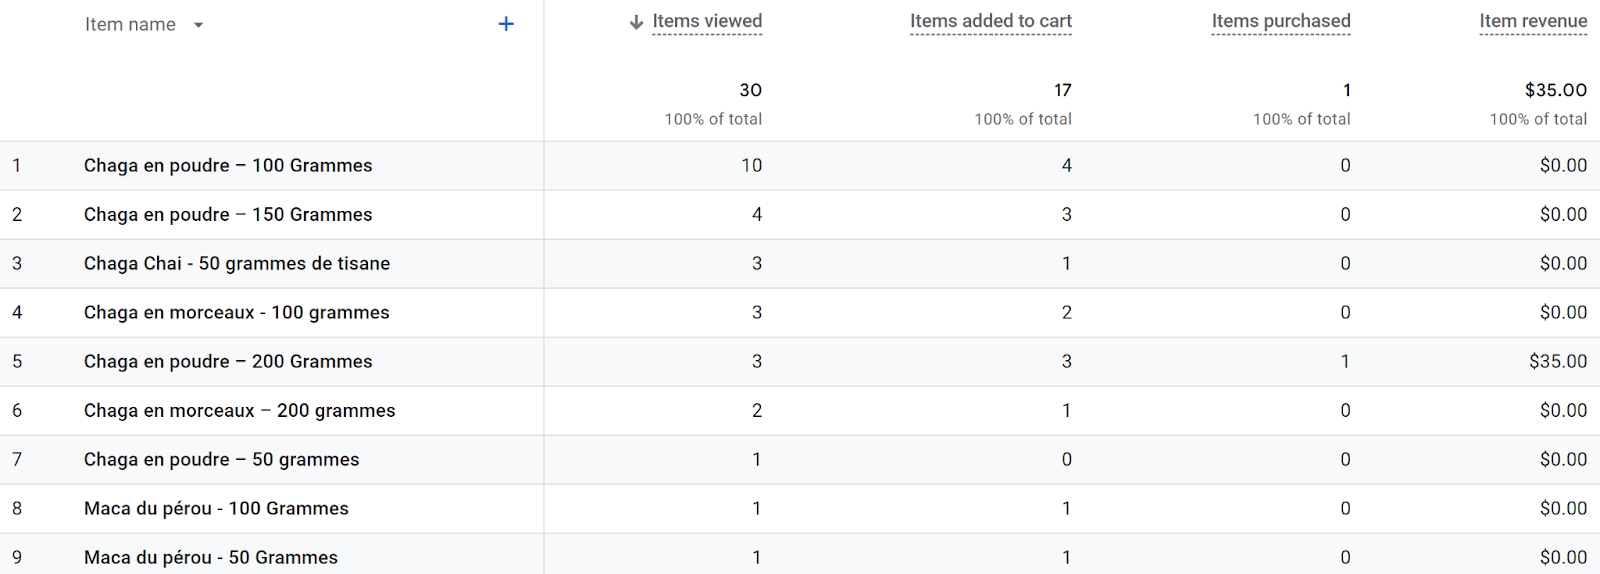
The view_item event should be triggered when a product page is loaded. It allows you to know how many times a product details page is visited and to cross this statistic with the other ones you track.
In the above screenshot, we can, for instance, see that the product in the first line was viewed (its dedicated page) 10 times, added to the cart 4 times (see next event) and never purchased. It is an add to cart rate of 40% and a purchase rate of 0%.
Beside its name (view_item), this event needs to use at least the items parameter which needs to nest at least the item_id (usually the SKU) or item_name (the product name) field. You can however send many more details with it, such as the category or categories it belongs to (item_category(.*) parameter).
If you don’t know what an event parameter is, let’s put it simply: it is an added information sent with the event for segmentation needs. Make sure to read the documentation linked below to see what parameter is needed for each event and what type of information it should return.
Check the documentation to get more details.
As its name implies, the add_to_cart event is triggered when a product is added to the cart. In our opinion, it is an important link in the customer journey between when a product details page is visited and when the same product is purchased.
If you check the documentation, it has the same parameters requirements as for view_item. However, depending on your store, it might be useful to add the optional quantity parameter at the item level.
We think that this event is not as crucial as the 3 others listed here. However, it is another link in the customer journey which can be interesting to track. When you use the 4 events listed here, you have a full picture of where users stop the most.
begin_checkout is normally triggered when a user starts the checkout process. However, it might depend on the flow in place in your store. Sometimes, users need to go through their cart in order to finalize their order, in which case it might be useful to trigger it then.
The event has the same parameters requirements as for the two previous events.
If you have one event to put in place, that would be the one. purchase needs to be triggered when a transaction is successfully completed. Typically, it is sent when the Thank you page is loaded. However, ideally, make sure that it is not going to be triggered if a user reloads that page as it is going to create issues.
This is a more complex event as it needs to return more information. Although only the transaction_id (which should ideally load the transaction ID used by your system) and items parameters (with item_id or item_name) are required, it is usually interesting to add more details.
Indeed, you might want to send the value (the value of the transaction), the tax (the taxes included in the transaction - if you use this parameter, it is best practice to remove this amount from the value parameter), the coupon (if a coupon was used for the transaction, it is useful to analyze your coupons effectiveness) parameters, for instance.
At the item level (for each item), the price parameter is a must as it is going to allow you to get the revenue at the item level (as shown in the above screenshot) as well as the quantity - other fields such as item_category and brand could also be very interesting to get more information for your analysis.
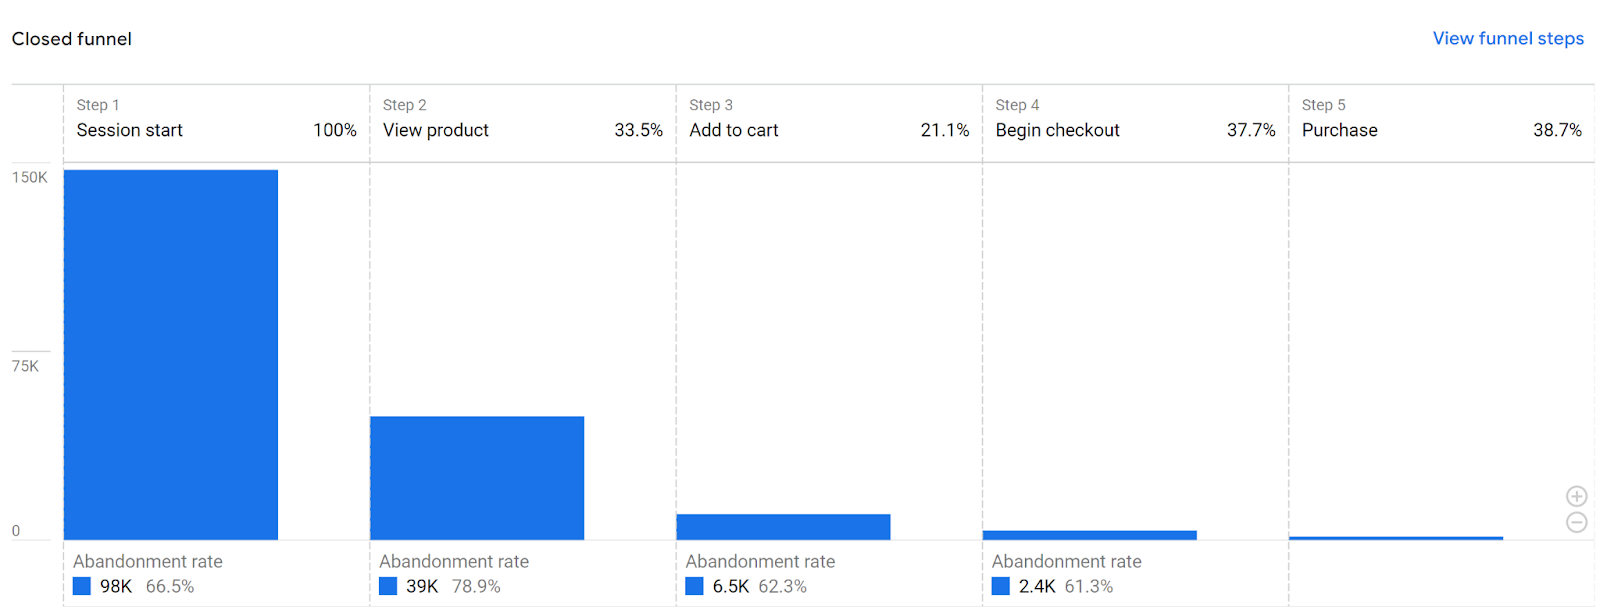
The events listed above are, in our opinion, the most important ones (they’re needed to use a funnel such as the one here). However, you need to keep in mind that you can pick which events you want to implement based on the information you need.
For instance, you can choose to trigger only the purchase event if you just want to track transactions, revenue and item revenue / quantity.
Alright, so now let’s move on to a key question: how do we get those events in place for your online shop?
Unfortunately, it really depends on a few things:
Let’s explore your options.
The good news is that, thankfully, some CMS, especially the ones which are the most popular with ecommerce store owners, offer a native (or quasi native - via plugins) integration.

It is, for instance, the case of Shopify. With Shopify, once you install Google Analytics 4, the CMS is going to automatically start sending ecommerce events. Keep in mind that it doesn’t send all the ecommerce recommended events though, only the essential ones.
Unfortunately, Wordpress, the most popular CMS on earth, doesn’t offer such a straightforward solution. However, if you are using Woocommerce, an official additional plugin is provided to send the events in question. Other solutions exist.
If you are using another CMS, you need to check its documentation in order to see what your options are. Our tip is to search in Google : “{CMS name} + GA4” or “{CMS name} + GA4 ecommerce” if the results you get are too broad.
As mentioned above with the Wordpress / Woocommerce example, you can use extensions or apps within your CMS to adapt or add the events implementation you need.
For instance, some Shopify users prefer using an app versus the native integration in order to tweak the ecommerce GA4 implementation.
With Magento, it all depends on the version of the CMS you use, but using extensions is very common.
Again, check your CMS documentation and maybe the plugins / apps marketplace to check what’s best for you.
Unfortunately, in some cases, depending on the CMS, but also your needs, you might need to:Edit your theme / website templates in order to tweak your events integrationOr completely build this integration from scratch if your CMS doesn’t support it in some ways or if you use a custom CMS / website.
This is not necessarily an issue depending on your resources.
About the author
Augustin Delporte
Owner and operator of Pragm. GA4, Google Tag Manager, BigQuery, technical SEO, GEO and Google Ads consultant.
Augustin Delporte is a senior marketing expert who helps companies fix their analytics, SEO and Google Ads so they can trust their numbers and get found in Google and AI search.
Here is an up-to-date, step-by-step tutorial to show you how to create Google Analytics 4 events using Google Tag Manager.

Learn how you can use GA4 for content marketing analysis and strategy. Transform data into actionable insights and tailor content to audience desires.